

Water bath canning quick grape jelly is the easiest beginner recipe to learn how to water bath can. It requires very few and cheap ingredients, so if you “mess up”, you won’t be out a ton of money.
This post contains some affiliate links, which means if you use the link I provide, then I make a small commission at no extra cost to you. Read my full disclosure here.
When I first started water bath canning, I knew I wanted to can grape jelly, but I made a mistake. I used a different recipe than what I’m sharing today. Let me just spare you the pain and torture of that mess that was supposed to be grape jelly and was actually grape sucker (the first time) and grape syrup (the second time).
Trust me when I say, this is the best recipe for a beginner. 100% success every time!
Canning Books

One of the BEST tools you can find for canning of any kind are Ball canning books. You can clearly see my Ball Blue Book is pretty rough looking because I love and use it so much!
Find the Ball Blue Book here.
Find the Ball Complete Book of Home Preservation here.
The “Quick Grape Jelly” recipe I’m sharing today is from the Ball Blue Book (page 58).
Tools You’ll Need
Tools for Quick Grape Jelly

- water bath canner (I thrifted mine for $10!)
- large pot (if you’re doubling the recipe, use a large stock pot)
- liquid measuring cup
- dry measuring cup
- wooden spoon
- canning jars (I’m using half pints, but quarter pints are great for gift giving)
For Water Bath Canning

- canning funnel
- canning tongs
- ladle
- headspace measuring tool
- old kitchen towel (grape jelly can stain so I hang on to old towels for canning messes)
- white vinegar
- dish cloth or paper towels (for vinegar)
Ingredients for Grape Jelly

- 3 cups of bottled 100% grape juice; room temperature
- 1 1.75oz box of pectin
- 4 1/2 cups of organic sugar
That’s it! I especially love this recipe because it’s a great pantry staple to keep on hand for any time you want or need to make grape jelly.
How to Prep your Kitchen for Canning

First, I prep my kitchen for making jelly and water bath canning by getting my stove set up.
I place my water bath canner on the biggest burner and fill the canner half way full of cold water.
Fun fact: Cold water boils faster.
Then I place the pot I’m using to make the jelly next to the water bath canner.

Wash your jars with hot soapy water. Once they’re clean, I add them into the water bath canner to keep warm and to help sterilize them. Plus, it helps you measure to make sure you have enough water in your water bath canner to can them properly.
This recipe makes about 5 half pint jars of jelly. When a recipe calls for a certain amount of jars, I typically tend to add in 1 or 2 more jars just in case there is extra.

Create a landing zone for your jars for them to sit for 12 hours.
Place a towel down (or if you’re like me an apron) so the jars don’t crack on a cool counter.
Now you should be all set to make your quick grape jelly and to water bath can!
How to Make Quick Grape Jelly

Combine grape juice and pectin in a pot. Bring mixture to a boil over high heat, stirring to mix in the pectin.

Add sugar and stir until the sugar dissolves.
Tip: pre-measure out everything before-hand to make your life easier. Trust me!
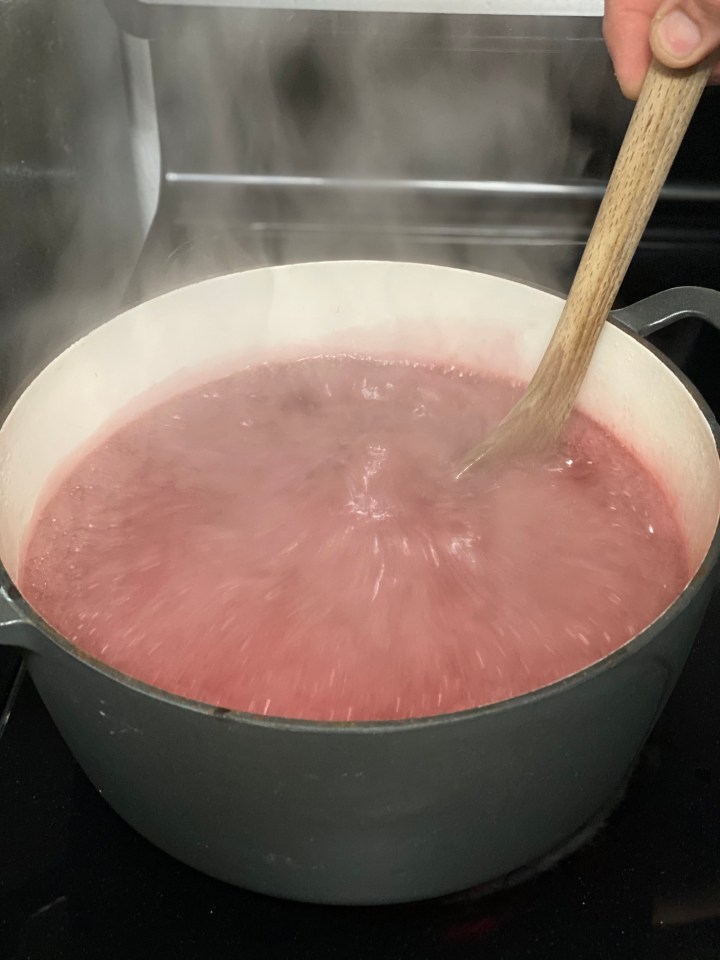
Bring mixture to a rolling boil that cannot be stirred down. Boil hard for 1 minute (set a timer!) and stir constantly.

After a minute, remove from heat and skim off the foam if necessary.

The grape jelly looks like this once the foam is gone.
This smelled so good, I made a fresh batch of homemade buttermilk biscuits just so I could have some!
You have now successfully made homemade quick grape jelly!
How to Water Bath Can Quick Grape Jelly

Move your hot pot of quick grape jelly to your jar filling area.
Pull a hot jar out of the hot water bath canner and place on your canning funnel.

Ladle the hot jelly into a hot jar, leaving 1/4 inch head space.

This measuring tool is extremely helpful for beginner canners. It makes the headspace measuring process a lot easier.

Wipe the jar rim off with a cloth with a little white vinegar on it. This step is important because it ensures a good seal.

Add the lid and the band to the jar. Close until fingertip-tight.
How I ensure it’s not too tight is, I put the lid and band on with one hand. I turn until the band tightens just enough for the jar to start turning as well.
Repeat this process until all the jars are filled.

This recipe ended up making almost 6 half pint jars, but there wasn’t enough jelly for the last jar to be filled to the 1/4 inch head space mark. This is why I encourage having extra jars.
Also I was so bummed I had to leave out this jar of jelly so I could sample it. *wink, wink!*
Refrigerate any left over jelly once it’s cooled.

Lower the rack into simmering water. Water must cover jars by one inch.
Tip: Add a splash of white vinegar to the water bath canner to help the jars not get white spots on them.

Adjust heat to medium-high, cover canner and bring water to a rolling boil.
Process half-pint jars for 10 minutes. Be sure to set a timer!

Once they are done processing, turn off heat and remove cover. Let the jars cool for 5 minutes before removing them from the water bath canner.

After 5 minutes, remove the jars from the canner.
DO NOT RETIGHTEN BANDS!
How to Store Canned Items

Place in your landing zone and cool for 12 hours. You’ll hear the best noise in the world to a beginner canner; the little popping sound of your jars sealing.
After 12 hours, label the jars with the name and date and remove the rings. Don’t throw the rings away. You can reuse them!
I typically say to eat within a year, but if stored in a cool, dark place, you may be able to go a little longer.

Serve with love on a fresh homemade biscuit!
What’s your favorite thing to eat with grape jelly? Comment down below!
Pin for Later

THANKS FOR TELLING ME HOW LONG TO WATER BATH JELLY FOR I THOUGH IT WAS 15 MINS