

When I first started to learn how to pressure can, I was TERRIFIED! No really you can ask my husband. It’s rather embarrassing honestly. *face palm*
I personally needed a step-by-step “how to” guide to hold my hand. I didn’t have one, so I’m creating one for someone out there who needs their hand held like I did.
This post contains some affiliate links, which means if you use the link I provide, then I make a small commission at no extra cost to you. Read my full disclosure here.
Homemade bone broth is the easiest beginner recipe for pressure canning, plus it’s so good for you!
I also like making my own bone broth at home, because I’m creating healthy food from things I would’ve just thrown away.
Goodness I love repurposing things!
Homemade Bone Broth

Tools You’ll Need
- Instant Pot
- large bowl (mine came in a set)
- colander
Ingredients
- bones (chicken, turkey, beef, etc.)
- apple cider vinegar
- water
- salt (optional)
How to make bone broth

Place the bones you have saved and put them in your Instant Pot.

Add a generous splash of apple cider vinegar. This really helps get out all of the nutrients from the bones and makes your bone broth incredibly delicious.

You can also add in veggies scraps such as onion peels, carrot skins, celery ends, etc. I keep all of mine in a baggie in the freezer to throw in to bone broth.
This time my pot was pretty full, so I left them out.

Cover the bones with water. Mine was very full, so I only filled to the fill line in the instant pot.
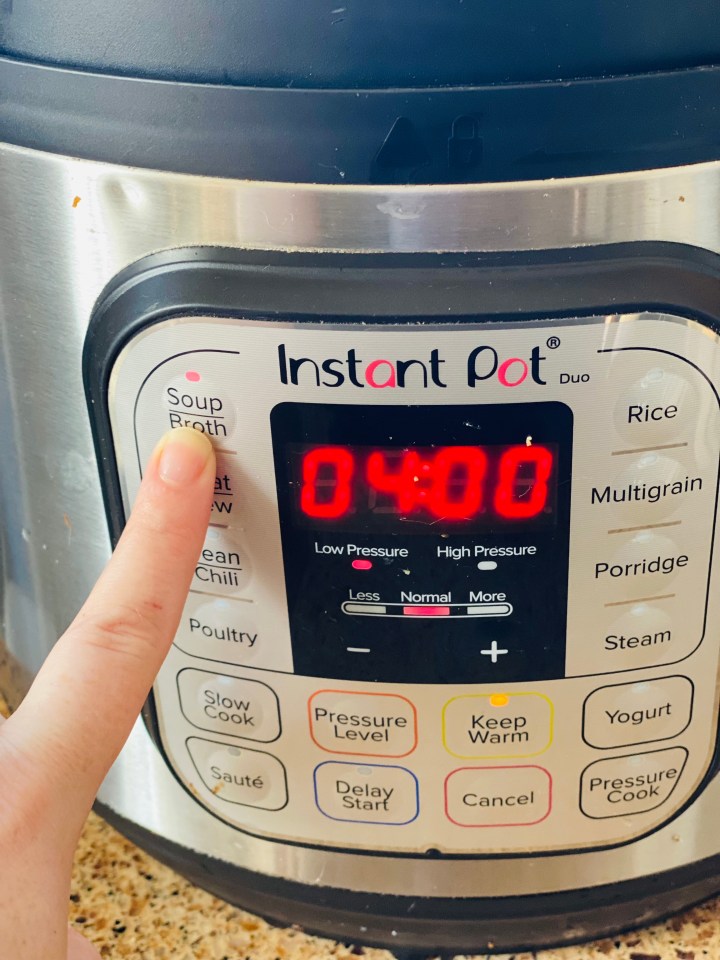
Place the lid into the locking position and set the vent to “sealed”. Press the soup button twice and set the time to 4 hours.
You will do this twice (8 hours total).
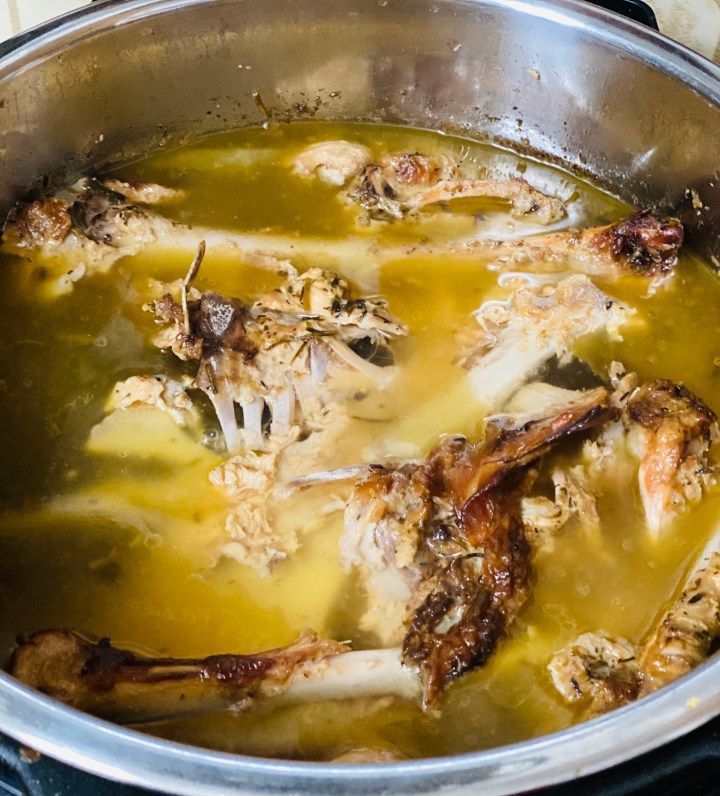
It will be rich and golden when it’s finished. Plus, your house will smell amazing!

Put a colander in a large bowl or pot to strain out the bones from the broth.

It will look like this when it’s finished. You can absolutely run it through a cheese cloth to get all the herbs and extra bits out, but I don’t mind them so I just leave it.
Place in the fridge to cool and solidify fat to remove it easier.
If you’re using right away, enjoy!
If you’re pressure canning it, keep reading!
How to Pressure Can
Tools You’ll Need
- pressure canner
- large pot
- ladle
- canning funnel
- canning tongs
- headspace measurer (got mine in a set)
- canning jars
- white vinegar
- dish towels (for resting the jars on)
Prep

Prep a “landing zone” for your jars for when they’re ready to come out of the pressure canner. They need to sit on a towel so the cold counter don’t shatter the hot jar.

I don’t have a big kitchen, so I have to prep a jar filling area. Ideally, you want to fill your jars while the broth is on the stove, but I fill quickly in my jar filling area.
In this area I put a hot pad, tongs, ladle, funnel, headspace measurer and a dish cloth with vinegar on it to clean the rims.

In your pressure canner, place at least 2 inches of water in the bottom and begin warming.
Wash your jars that you want to can with. I am using quart jars. Then place them in the canner to keep warm.
Tip: prep extra jars! I filled my canner with the max amount of jars that way I knew how many jars would fit in there and that I wasn’t going to have too many filled jars waiting to be canned, or not enough prepped jars.
Pressure Canning Bone Broth

Heat your broth and make it pretty hot. I heat mine until almost boiling.
You basically want the jars and the broth to be the same temperature so the jar doesn’t shatter.

I do both at the same time to save time.

Once the broth and the jars are both warmed, move your pot of broth to your jar filling station.

Be careful! Everything is hot!
Fill your jar until you have 1 inch head space.

The headspace measuring tool makes this step super easy and accurate.

Wipe the rim of the jar off with white vinegar to ensure a good seal.

Place the lid and ring on finger tip tight.
Tip: Only use one hand to put the lid on. Once the jar starts to turn and you turn the band, it’s tight enough.

Repeat this step until the jars are filled. I made 4 quarts.
Add a splash of white vinegar into the pressure canner so you don’t get a white residue on your jars.
I forgot this step and realized after it was at pressure. *hangs head in shame*

Put the lid on your canner and set to locked position. Turn to medium-high heat.
After a couple of minutes, it will start venting steam out of the vent (as shown in picture).
Vent steam for 10 minutes. Set a timer!

During this time, the lock should pop up. This always reminds me of the instant pot. If you see this up, DO NOT TAKE OFF THE LID!

Once the venting time is completed, it is time to put on the weight. I put mine on while holding a cloth so I don’t get a steam burn.

It will look like this.

You want to get your pressure canner to 10 pounds of pressure. Once you’ve reached 10 pounds, process for 25 minutes (quarts), 20 minutes (pints).
Be sure to check your altitude as well! Depending on your altitude, your pounds will change.
Also it can go above 10 psi, but it can’t go below or you will have to restart your processing time all over again.
For more details, check here.
What to do while pressure canning
It is important that you stay and babysit the canner. You have to monitor the pressure canner so it doesn’t get too hot, that’s what makes it get dangerous. Always keep an eye on the gage.
I personally get a chair, sit in the kitchen and listen to an audio book while I wait.
As a mom of 5, it’s my little vacation time. Haha!
Pressure Canning Bone Broth Cont.

After the 25 minutes processing time is over, shut off the stove. Don’t touch anything! Let it come down to zero naturally.
Once it’s at zero psi, let it sit for 5 minutes.
Test that it’s ready to open by touching the weight. If it doesn’t make a sound, you may safely remove it. If it does, give it a couple more minutes.
Also make sure the locking pin has gone back down.

Remove the lid from the canner and let the jars rest in the canner for 5 minutes.

Move the jars to the “landing zone” you prepared earlier. Let them cool for 12 hours before moving.
Label the jars and remove the rings before storing.
SEE! It wasn’t that bad now was it?! Look at the beautiful homemade bone broth you just pressure canned yourself!
I’m proud of you!
Have you wanted to pressure can something but where too afraid to do it? Let me know down below!
Pin for Later

You make it seem so simple! Thank you for making the hand holding guide I always needed!
It is simple once you just jump in. My first time I needed guidance and the only hand I had to hold was my husbands and he was just as clueless. Haha!
Canning my first batch of bone broth today! We have a lot of soup bones in the freezer I’ve been neglecting! Thank you for the easy to follow steps! 🙂
I’m so glad this step-by-step tutorial has been helpful! Let me know if you have any questions, and good luck canning!